Let’s be real here, not having a proper Google Ads – Shopify integration and following best practices can be a costly mistake.
We get it.
Dealing with Google Ads integration issues, errors, and inaccuracies can be frustrating. And let’s not forget about the struggles with product feed, conversion tracking, and remarketing setup. It can all leave you feeling disappointed.
But fear not! We’ve got your back with the ultimate guide to achieving an accurate Google Ads Conversion Tracking for your Shopify store.
Now, we won’t sugarcoat it.
This topic is complex, and there are no quick hacks or shortcuts. So, take your time. We’ve made sure it’s packed with valuable insights and actionable tips specifically tailored for Shopify brands who want to unlock the full potential of Google Ads.
Here’s what you can expect to find inside:
- Understanding Primary vs. Secondary Google Ads Conversions
- How to Set up A New Conversion
- How to Set up Purchase Conversion on Shopify without Coding, or an app, or GTM
- Troubleshooting Common Problems: Get practical solutions for the most common issues you may encounter along the way.
So, grab a cup of coffee, get comfy, and enjoy this journey towards a rock-solid Google Ads integration for your Shopify store.
Understand Google Ads Conversions – Primary vs. Secondary Conversions
If you’re new to Google Ads, you may need help distinguish Primary & Secondary Conversion Actions.
Let’s break it down, Shopify-style.
Imagine you’re a brand, and you want your Ads to be optimized for Purchase Conversions, and you don’t want those sneaky Newsletter Subscriptions messing with your bidding strategies.
However, you still want to keep an eye on those subscriptions and see how your Ads perform in that area. That’s where the balance of primary and secondary conversion actions comes in!
According to Google:
The primary conversion actions are the rockstars. They’re the ones that help optimize your bid strategies, and they take the spotlight in the “Conversions” column of your reports.
On the other hand, secondary conversion actions are more like the entourage. They’re there for observation purposes only and chill out in the “All conversions” column, even if their corresponding goal is used.
Pro Tip: Use Transactions and Revenue or Primary Conversion Goals
Have only one conversion as your primary action – for most Shopify owners, that is your transactions and revenue.
If you go overboard and set multiple primary conversions, you might end up with a case of double/triple counting, or spending money optimizing on secondary goals that will end up costing a lot of money.
Advanced best practices for tech-savvy ecommerce marketers:
- Set your main Google Ads Conversion (Purchase) directly to Shopify’s Checkout.liquid (you need to have a Shopify Plus account) as your primary conversion.
- Import your Google Analytics 4 “Purchase” event as a secondary conversion. Consider it your backup in case something wrong happens to #1.
- Import your native Universal Analytics “Purchase” event as another secondary conversion. Think of it as your loyal sidekick, who is gong to retire soon though.
I can hear you saying, “Hey, slow down a bit and let’s take it one step at a time.”
And guess what? That’s exactly my plan too!
So let’s start with Step 1:
How to Set up Google Ads Conversion Tracking Directly on Shopify
How to Create Conversions on Google Ads: A Step-by-Step Guide for the 2023 New Dashboard
If you haven’t created any conversions on your Google Ads account yet, don’t worry!
Follow these simple steps to create a new conversion in Google Ads and set it up properly on your Shopify store.
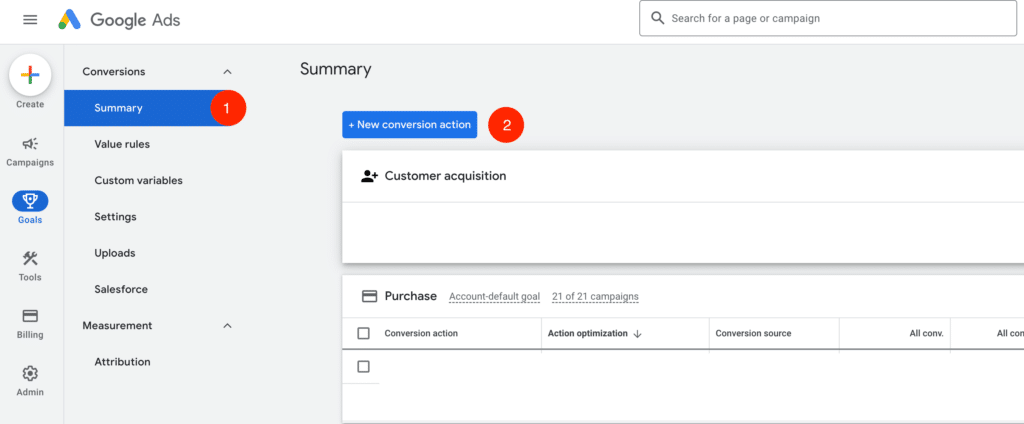
Step 1: Log in to your Google Ads account and click on “Goals” in the left menu. Then, select “Summary” Under “Conversions.” (This is under “Tools & Settings” > “Conversions” on the old dashboard.)
Step 2: Click on “New Conversion Action” in the top left corner to begin creating a new conversion.
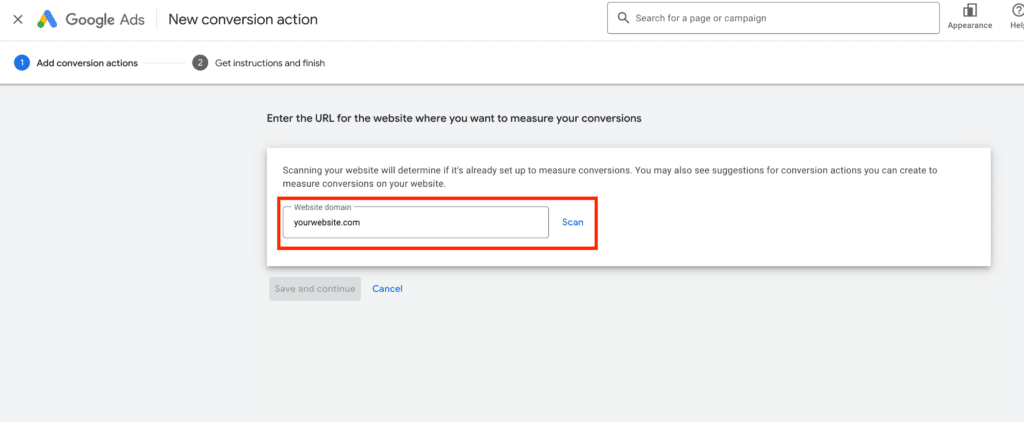
Step 3: Conversion Type Choose “Website” as the conversion type and enter the website domain to scan if a conversion action is already setup.
Since you haven’t set up the conversion actions, it will take a second and ask you to create a conversion action manually.
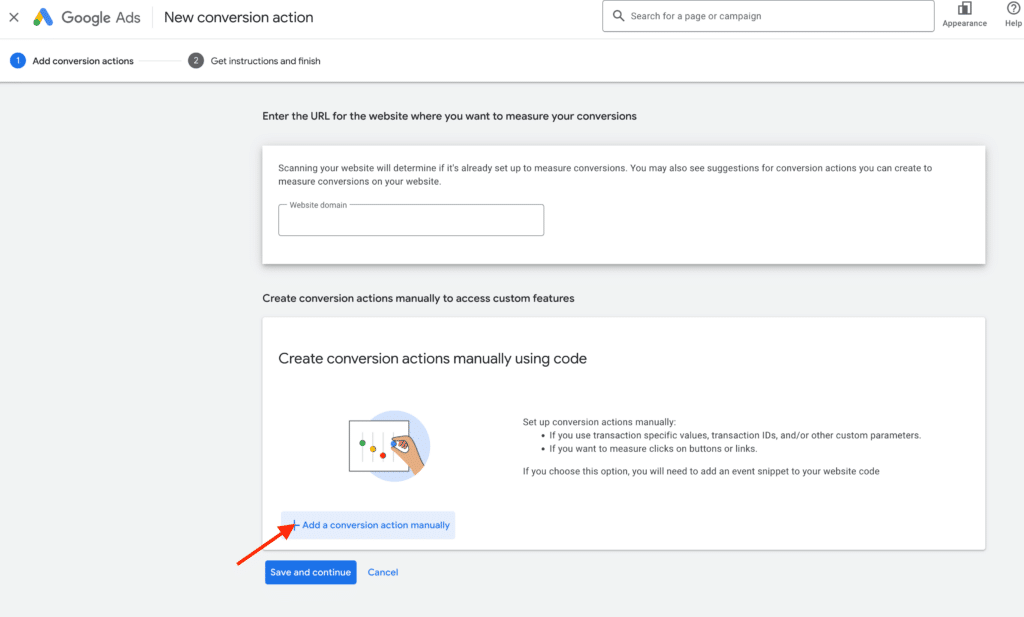
Step 4: Enter Conversion Action Details:
- Choose “Purchase” for the Goal category
- Give it a name, for example “Purchase”
- Choose “use different values for each conversion” unless all your products have the same price and you don’t need dynamic values.
- Choose “Every” for Count
- Choose your preferred conversion window and attribution model. We recommend using the “Data-driven” model.
- Turn on Enable Enhanced CPC
- Click the “Done” button
Then you’ll be redirected to the previous step.
Step 5: Click on “Save and continue” to finish creating the conversion.
Now that you’ve created your conversion on Google Ads, you can proceed to set it up properly on your Shopify store.
Choose “See Event Snippet” for Manual Set up (without GTM) – You need to have Shopify Plus and Shopify Admin access.
Step 1: Select the Conversion
Log in to your Google Ads account and click on “Goals” in the left menu. Then, select “Summary” Under “Conversions.” Then click on the Conversion name you want to set up.
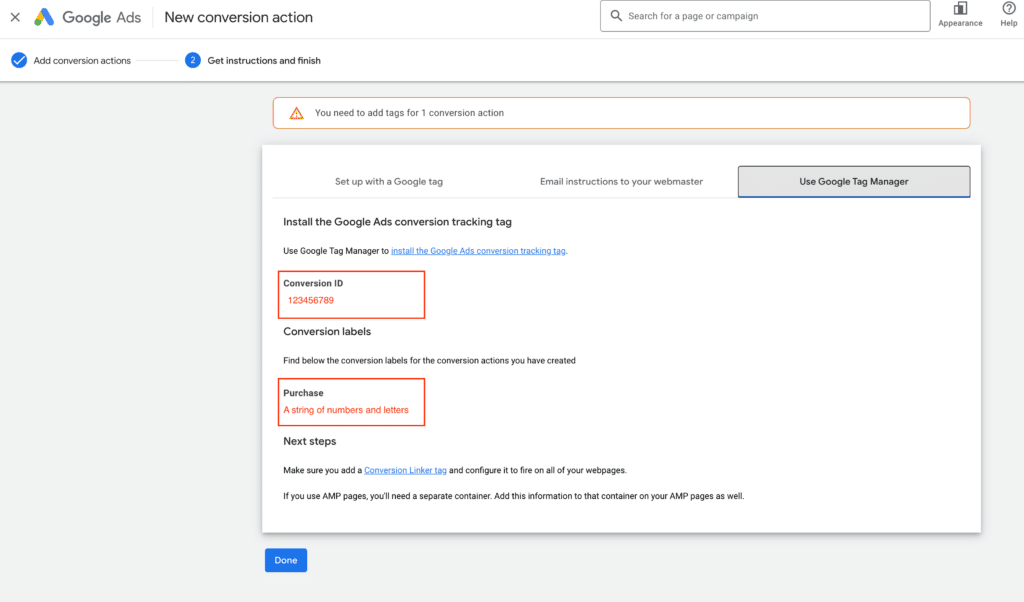
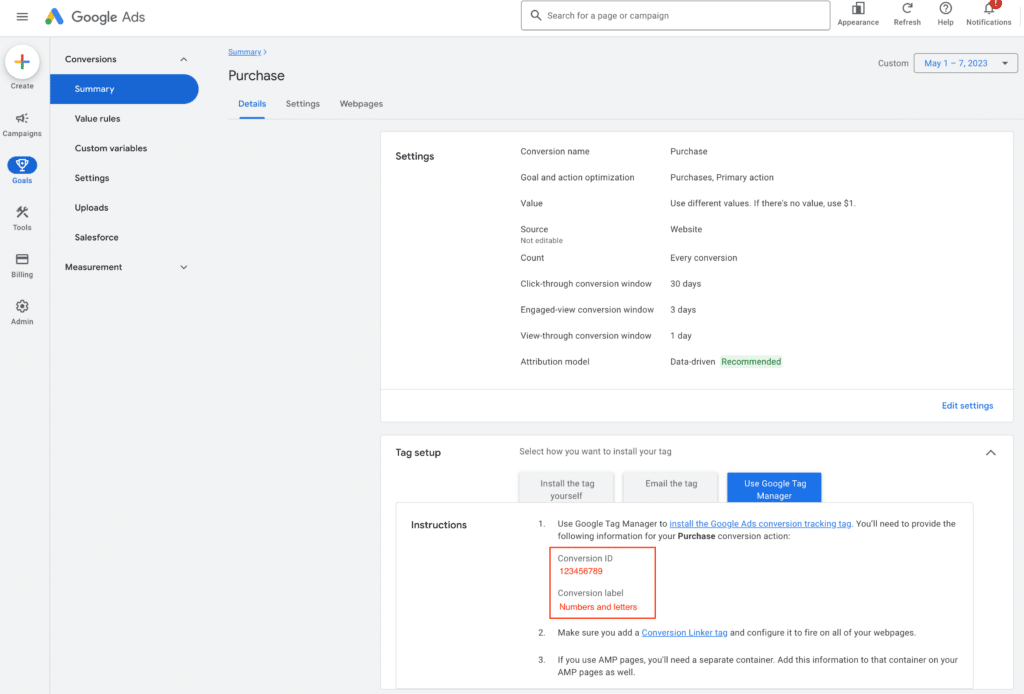
Step 2: Find your Conversion ID and Conversion Label
Click on “Details” and then lower on the page Click on “Tag Setup” > “ Use Google Tag Manager”
(Note: We are not setting up the conversion through Google Tag Manager on this tutorial. But this is the easiest way to get the conversion ID and label.)
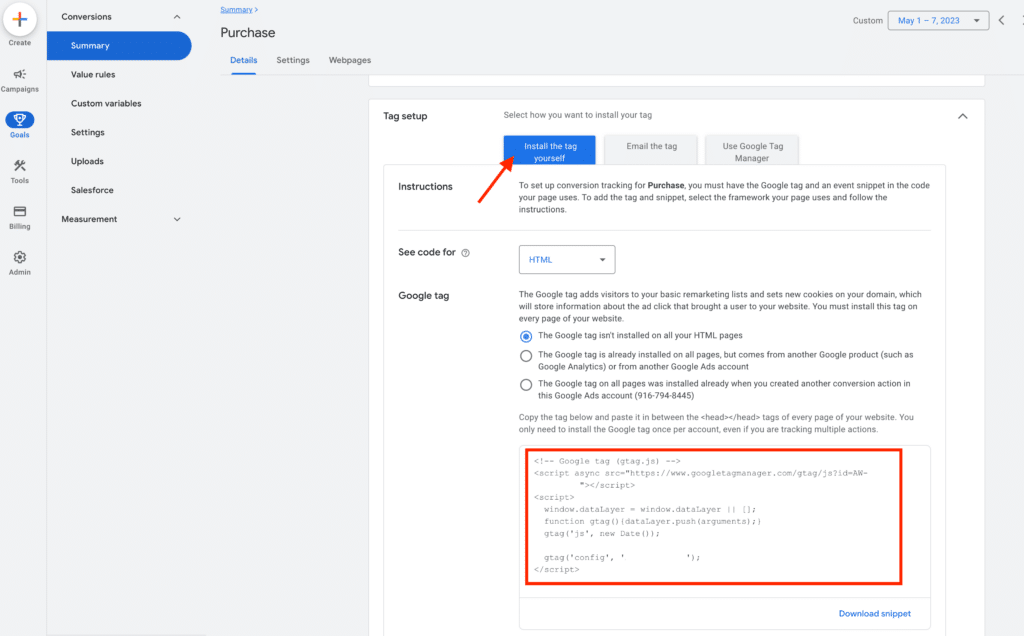
Step 3: Install the Google Tag to Theme.liquid on Shopify
Click “Install the tag yourself” and Copy the First HTML
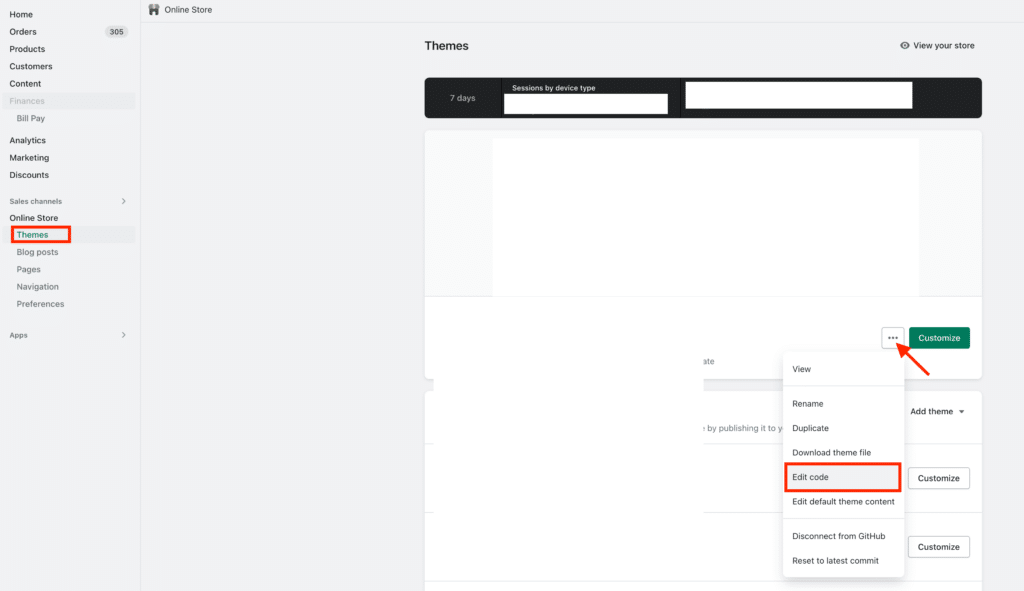
Log in to your Shopify Plus store, go to “Online Store” > “Themes” > “…” > “Edit Code”
Then find the theme.liquid file – usually under Layout, and add the Google tag between <head> and </head>
If there is any {endif} code, add the tracking code after that.

(Note: If you customized your Shopify theme and had a different name for the theme liquid file, please confirm it with your developer.)
Step 4: Add the Event snippet to Checkout.liquid on Shopify – This is how you track conversion values and details on your checkout page.
Copy the code below and change the ID and label.
This is the standard code for most Shopify stores track purchases. You may need to make some adjustments, for example changing the default currency from USD to what you use for your store.
Then go to Shopify Store Admin > Settings > Checkout > Additional Scripts and paste your code there.
<!– Global site tag (gtag.js) – Google Ads:(replace this with your ID) –>
<script async src=”https://www.googletagmanager.com/gtag/js?id=AW-123456789 (replace this with your ID) “></script>
<script>
window.dataLayer = window.dataLayer || [];
function gtag(){dataLayer.push(arguments);}
gtag(‘js’, new Date());
gtag(‘config’, ‘AW-(replace this with your ID)’);
</script>
{% if first_time_accessed %}
<script>
gtag(‘event’, ‘conversion’, {
‘send_to’: ‘AW-(replace this with your ID)/(replace this with your conversion label)’,
‘value’: {{ checkout.total_price | money_without_currency }},
‘currency’: ‘{{ currency }}’,
‘transaction_id’: ‘{{ order.order_number }}’
});
</script>
(Note: Make sure to have the forward slash (“/”) – between your conversion ID and label.)
Troubleshooting Common Google Ads Conversion Errors
During our extensive experience with over 100 setups, we’ve encountered several common mistakes made by Shopify brands and their developers.
Let’s dive into a few of the most popular ones and how to avoid them:
Wrong Conversion Data:
It’s crucial to ensure the correct setup of conversion tracking. We often hear cases where conversion tracking is active but counting conversions incorrectly.
This misleading data can have disastrous implications, misleading your optimization efforts and Google Ads AI.
If you have reasons to believe your conversion setting is inaccurate but don’t know how to debug, feel free to reach out to us for a free consultation.
Missing or Duplicated Conversion Tracking:
To prevent double-counting of conversions, it’s essential to have one primary conversion with proper tracking in place.
Refer to the “Primary Conversions” section above for detailed instructions and screenshots.
Not Connecting Google Analytics Account with Google Ads:
For optimal results, connect both your Google Analytics 4 and Universal Analytics accounts with Google Ads.
Don’t forget to import these purchase tracking as a secondary conversions. They serve as backups not to replace your on-site Conversion.
Wrong Attribution Model:
Many Shopify merchants stick with the default “Last Click” attribution model without understanding the various options available.
It’s important to note that different attribution models assign credit to different touch points along the customer’s journey.
By solely relying on the “Last Click” model, you may overlook the valuable contributions of earlier interactions that influenced the customer’s decision.
To optimize your advertising efforts and gain a more accurate understanding of how each touchpoint contributes to conversions, it’s worth exploring alternative attribution models.
Here are a few options:
- First Click: This model attributes the conversion entirely to the first interaction a customer had with your ads. It’s particularly useful for understanding how you’re initially attracting and capturing customers.
- Linear: The linear model assigns equal credit to each touchpoint in the customer journey, giving a more balanced view of the entire funnel. It acknowledges that multiple interactions contribute to the conversion.
- Time Decay: With the time decay model, more credit is given to touch points that occur closer to the conversion event. It recognizes that interactions closer to the purchase often play a more significant role in influencing the customer’s decision.
- Position-Based: Also known as the “U-shaped” model, this attribution model assigns 40% of the credit to both the first and last interactions, with the remaining 20% distributed evenly among the touch points in between. It acknowledges the importance of both the initial and final interactions.
- Data-Driven: Data-Driven Attribution takes advantage of machine learning algorithms to analyze your unique customer journey data and assign credit to different touch points based on their influence on conversions. It considers multiple factors, such as the order and frequency of interactions, the time between them, and the conversion rates associated with each touch point.
If you’d like more information or guidance on selecting the right attribution model for your Shopify store, feel free to reach out for a free consultation.
By avoiding these common mistakes, you’ll be on the right track to accurate and effective conversion tracking on Google Ads.
Google Ads Conversion Tracking FAQs
How are conversions tracked in Google Ads?
Conversions are tracked in Google Ads using a small snippet of code called the conversion tracking code.
This code (or pixel) is placed on the conversion page that follows a desired action, such as a purchase confirmation or a lead submission.
When a user completes the action, the code sends information back to Google Ads, which records and attributes the conversion to the corresponding ad campaigns, ad groups, or keywords.
Is conversion tracking necessary for Google Ads?
Yes, conversion tracking is essential for Google Ads. It provides valuable insights into the effectiveness of your advertising campaigns and helps you measure the return on investment (ROI) of your ad spend.
By tracking conversions, you can identify which ads, keywords, or campaigns are driving the most valuable actions on your website and optimize your advertising strategy accordingly.
How long does it take for Google Ads to track conversions?
Google Ads starts tracking conversions as soon as the conversion tracking code is implemented correctly on your website.
However, there may be a delay before you see conversions reported in your account. This delay can occur due to factors such as the user’s browser or device, the time taken for the order processing, your site speed affecting page load, or any delays in data synchronization between different platforms.
Generally, Google conversions should be reported within a few hours, but in some cases, it may take up to 24-48 hours for all conversions to be accurately tracked and reported in Google Ads.
How do I know if my conversion tracking is working on Google Ads?
To ensure that your conversion tracking is working correctly on Google Ads, you can try these two easy options:
- Test Conversions: Perform a test conversion on your website, such as making a purchase or submitting a lead form. After completing the action, check if the conversion is being recorded in your Google Ads account. You can use the “Conversions” column in your Google Ads interface to see if the conversion data is being tracked.
- Conversion Tag Status: Check the status of your conversion tracking tag in Google Ads. Go to the “Goals” menu and select “Summary” Look for the conversion action you want to check and ensure that the status is listed as “Recording conversions.”
How to enable enhanced conversion?
Enhanced Conversions is an effective feature designed to enhance the accuracy of your conversion tracking in Google Ads.
The automatic method of setting up enhanced conversions requires no changes to your existing conversion tracking code if you’re already using Google Tag Manager or the Google tag on your page.
With automatic enhanced conversions, you can choose which customer information on your website is automatically sent to Google for better attribution of your campaign conversions.
If the option for automatic enhanced conversions is not available in your Google Ads account, you can still manually implement enhanced conversions. This may involve editing code on your web page.
Please note that automatic enhanced conversions may not be available for all Google Ads accounts, but manual implementation options are still available.
We plan to update this article with enhanced conversion tracking in the next few weeks. If you’re interested in getting the manual, click here to sign up for a notification.
Or contact us to get it enabled on your ad account now. 🙂

